Fitting Aluminium Venetian Blinds
What’s in the Box
- Aluminium venetian blind (headrail, slats, and bottom rail pre-assembled)
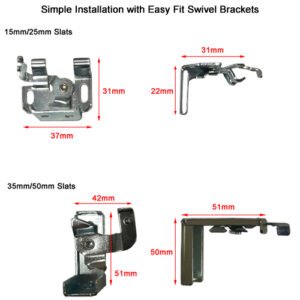
- Two mounting brackets (clip-in type)
- Screws and wall plugs
- Hold-down brackets (optional, for doors or tilt-and-turn windows)
Tools Required
- Pencil
- Tape measure
- Spirit level
- Drill with appropriate drill bit (wood or masonry)
- Screwdriver (Phillips head)
Recess Fit Installation
- Hold the brackets up to the top of the recess, positioning them approximately 50mm from each end of the headrail. Mark the screw positions with a pencil.
- Drill pilot holes and insert wall plugs if fixing into masonry. For timber frames, drill pilot holes directly.
- Screw the brackets firmly into place. Use a spirit level to ensure both brackets are aligned.
- Slide the headrail into the front of the brackets until it clicks into place. You should hear a definite snap as the headrail locks in.
- Test the blind by raising and lowering it fully. Check the tilt mechanism operates smoothly.
Exact (Face) Fit Installation
- Position the brackets on the wall or frame above the window recess. Allow at least 40mm above the recess for the headrail. Mark the screw positions with a pencil.
- Use a spirit level to ensure the bracket positions are perfectly horizontal.
- Drill, plug (if masonry), and screw the brackets into place.
- Click the headrail into the brackets.
- Test full operation: raise, lower, and tilt the slats.
Top Tip: If the blind is slightly too wide for the recess, do not force it. Remove the blind and check your measurements. Aluminium headrails can sometimes be trimmed by a few millimetres with a hacksaw if absolutely necessary, but this should be a last resort.
Child Safety
Aluminium venetian blinds with corded mechanisms must have a child-safety cleat fitted. Secure the cord cleat to the wall at a height of at least 1.5 metres from the floor, and wrap excess cord around the cleat when not in use. This is a legal requirement in the UK.
Fitting Wood Venetian Blinds
What’s in the Box
- Wood venetian blind (headrail, slats, and bottom rail pre-assembled)
- Two or three mounting brackets (depending on blind width; centre bracket included for blinds over 900mm wide)
- Screws and wall plugs
- Valance clips (if applicable)
Tools Required
- Pencil
- Tape measure
- Spirit level
- Drill with appropriate drill bit
- Screwdriver (Phillips head)
Recess Fit Installation
- Position the brackets at the top of the recess, approximately 50–75mm from each end of the headrail. If a centre bracket is supplied, position it centrally.
- Mark all screw hole positions with a pencil.
- Drill pilot holes. For masonry, use wall plugs. For timber, drill directly.
- Screw the brackets securely into place. Verify alignment with a spirit level.
- Slide the headrail into the brackets from the front, pushing upward until the headrail locks into each bracket with an audible click.
- Attach the valance (decorative front cover) by clipping it onto the valance clips on the front of the headrail.
- Test the blind by raising and lowering it completely, and tilting the slats open and closed.
Exact (Face) Fit Installation
- Position the brackets on the wall above the window recess. Mark screw holes ensuring the brackets are level.
- Drill, plug, and screw the brackets into position. Use heavy-duty fixings for wide blinds as wood venetians are considerably heavier than aluminium.
- Click the headrail into the brackets and attach the valance.
- Test full operation and ensure the blind hangs straight.
Important: Wood venetian blinds can be heavy, especially wider sizes. For blinds wider than 1200mm, we strongly recommend having a second person assist with installation. Always ensure your fixings are rated for the weight.
Child Safety
Fit the cord safety cleat to the wall at a height of at least 1.5m from the floor. Wrap excess cord around the cleat when the blind is not being adjusted. For added safety, consider upgrading to a wand-tilt mechanism.
Fitting Roller Blinds
What’s in the Box
- Roller blind (fabric pre-attached to the roller tube)
- Two mounting brackets (one with a pin, one with a chain mechanism or spring mechanism)
- Chain and connector (for chain-operated blinds)
- Screws and wall plugs
- Child safety clip (for chain-operated blinds)
Tools Required
- Pencil
- Tape measure
- Spirit level
- Drill with appropriate drill bit
- Screwdriver (Phillips head)
Recess Fit Installation
- Identify the pin-end bracket and the chain/mechanism-end bracket. The chain mechanism should be on the side you specified when ordering (typically the right).
- Hold the brackets up to the top of the recess at each end, leaving approximately 30mm from the edges. Mark the screw positions.
- Drill pilot holes and insert wall plugs if required.
- Screw both brackets into place, ensuring they are level and aligned at the same height.
- Insert the pin end of the roller into the pin bracket, then push the mechanism end into the other bracket until it clicks.
- Pull the blind down to test it rolls and retracts smoothly.
Exact (Face) Fit Installation
- Mark the bracket positions on the wall or frame above the recess. Ensure they are level using a spirit level.
- Drill, plug (if needed), and fix the brackets.
- Slot the roller blind into the brackets as described above.
- Test the operation – the blind should roll up evenly without drifting to one side.
Top Tip: If the blind does not roll up straight and tends to drift to one side, the brackets may not be perfectly level. Remove the blind, re-check alignment with a spirit level, and adjust if necessary.
Child Safety
For chain-operated roller blinds, fit the child safety clip to the wall or frame at a height that keeps the chain loop taut and out of reach of children. The chain should never form a loop longer than 150mm when the clip is fitted. This is a legal requirement.
Fitting Vertical Blinds
What’s in the Box
- Headrail with carriers pre-installed
- Fabric louvres (individual slats, packed separately)
- Bottom weights and chains
- Two or more mounting brackets (depending on width)
- Screws and wall plugs
- Wand or chain control mechanism
Tools Required
- Pencil
- Tape measure
- Spirit level
- Drill with appropriate drill bit
- Screwdriver
- Step ladder (for high windows)
Recess Fit Installation
- Position the brackets at the top of the recess. The end brackets should be approximately 50mm from each end. For blinds over 1800mm wide, fit a centre bracket as well.
- Mark screw positions and ensure the brackets are aligned using a spirit level.
- Drill pilot holes and secure the brackets with screws (and wall plugs for masonry).
- Clip the headrail into the brackets – it should snap securely into place.
- Open all the carrier hooks so they face the same direction (perpendicular to the headrail).
- Hang each fabric louvre onto a carrier hook by inserting the sewn tab at the top of the louvre into the hook. Work from one end to the other.
- Insert the bottom weights into the pockets at the base of each louvre.
- Connect each louvre to its neighbours using the bottom chain, clipping the chain into the small hooks on each weight.
- Test the draw and rotate mechanisms. The louvres should slide smoothly along the headrail and rotate evenly.
Exact (Face) Fit Installation
- Position the brackets on the wall above the window recess. Mark, drill, and fix as described above.
- Ensure the brackets are high enough above the recess that the louvres will clear the windowsill when drawn.
- Clip in the headrail and hang the louvres as described above.
Important: Ensure all louvres are hung in the same direction with the sewn pocket at the back. If louvres are hung inconsistently, they will not rotate uniformly and the blind will look uneven when closed.
Child Safety
Vertical blinds with a chain-operated mechanism should have a chain safety device fitted. If the blind uses a wand control, no additional safety device is required. Ensure bottom chains between louvres are taut and do not form large loops.
Fitting Roman Blinds
What’s in the Box
- Roman blind (fabric with horizontal battens and headrail pre-assembled)
- Two mounting brackets
- Screws and wall plugs
- Cord cleat for child safety
- Operating mechanism (chain or cord)
Tools Required
- Pencil
- Tape measure
- Spirit level
- Drill with appropriate drill bit
- Screwdriver
Recess Fit Installation
- Position the brackets at the top of the recess, approximately 50mm from each end. Mark the screw positions.
- Drill pilot holes and fix the brackets using screws and wall plugs as appropriate.
- Check the brackets are level using a spirit level.
- Slide the headrail into the brackets or clip it in, depending on the bracket type.
- Gently pull the chain or cord to raise the blind, checking that the fabric folds evenly into horizontal pleats.
- Lower the blind fully and check it hangs straight. If one side hangs lower than the other, the brackets may need adjusting.
Exact (Face) Fit Installation
- Position the brackets on the wall above the recess. We recommend at least 100mm above the top of the recess to allow the folded fabric to sit above the glass when the blind is raised.
- Use a spirit level to ensure the brackets are perfectly horizontal.
- Drill, plug, and fix the brackets.
- Mount the headrail and test the blind.
Top Tip: When you first install a roman blind, the folds may not sit perfectly even. This is normal – the fabric will “train” over the first few days of use. Raise and lower the blind several times a day for the first week to help the folds settle into place.
Child Safety
Fit the cord safety cleat to the wall at a height of at least 1.5m from the floor. Always wind excess cord around the cleat. Some modern roman blinds use a chain loop – in this case, fit a breakaway chain connector and safety clip as supplied.
Fitting Day & Night (Vision/Duo) Blinds
What’s in the Box
- Day & night blind (dual-layer fabric pre-assembled on the cassette or open roller)
- Two mounting brackets
- Screws and wall plugs
- Chain mechanism and connector
- Child safety clip
Tools Required
- Pencil
- Tape measure
- Spirit level
- Drill with appropriate drill bit
- Screwdriver
Recess Fit Installation
- Identify the chain-end bracket and the pin-end bracket. Position the chain mechanism on the side you specified when ordering.
- Hold the brackets at the top of the recess, approximately 30–40mm from each end. Mark the screw positions.
- Drill pilot holes and fix the brackets securely. Ensure they are level.
- Insert the pin end of the roller/cassette into the pin bracket, then push the chain end into the mechanism bracket until it clicks.
- Use the chain to adjust the blind. The alternating sheer and opaque bands should align smoothly. When the opaque bands overlap, maximum privacy and light blocking is achieved. When the sheer bands align, natural light filters through while maintaining daytime privacy.
Exact (Face) Fit Installation
- Position the brackets above the window recess on the wall or frame. Use a spirit level to ensure alignment.
- Mark, drill, plug, and fix the brackets.
- Slot the blind into the brackets as described above.
- Test the chain mechanism to ensure smooth operation in both directions.
Top Tip: Day & night blinds operate by moving the front layer of fabric up or down relative to the back layer. If the bands are misaligned after installation, gently adjust the chain until the bands are in your desired position. The blind should transition smoothly between sheer and opaque.
Adjusting Light Control
- Maximum light: Align the sheer bands on the front and back layers so they overlap. Light passes through both sheer sections.
- Medium light / privacy: Partially offset the bands so the opaque band on one layer partially covers the sheer band on the other.
- Minimum light / full privacy: Align the opaque bands from front and back so they fully overlap, blocking most light.
Child Safety
Fit the child safety clip to the wall at a height that keeps the chain loop taut and out of reach of children. The chain must never form an unsecured loop of more than 150mm.
Fitting Perfect Fit Blinds
What’s in the Box
- Perfect Fit frame with blind pre-mounted (roller, pleated, or venetian)
- Frame clips (pre-attached or in a separate bag)
- Operating mechanism (spring tension, magnetic, or chain depending on blind type)
Tools Required
- None – Perfect Fit blinds are designed for completely tool-free installation
- A soft cloth for cleaning the glazing bead before fitting (recommended)
Installation Steps
- Clean the glazing bead (the plastic trim around the glass) with a soft cloth to remove any dust, dirt, or condensation. This ensures the clips grip securely.
- If the frame clips are not already attached, snap them onto the Perfect Fit frame at the positions indicated. There will typically be four clips: two at the top and two at the bottom (or one on each side for larger frames).
- Hold the Perfect Fit frame up to the window with the blind facing into the room.
- Align the top clips with the top edge of the glazing bead and push firmly until the clips snap over the bead. You should feel a positive click.
- Once the top is engaged, push the bottom clips onto the bottom glazing bead. Again, push until you feel them click into place.
- Gently tug the frame to confirm it is securely attached on all sides.
- Test the blind mechanism – raise, lower, and (for venetians) tilt to ensure smooth operation.
Top Tip: If the clips feel too tight or too loose, they may be adjustable. Some Perfect Fit frames have clips that can be repositioned along the frame rail. If the clips do not grip the bead, your glazing bead may be a non-standard size – contact us for advice.
Removing the Blind
- To remove a Perfect Fit blind (for cleaning or replacing), gently pull the bottom of the frame towards you to release the bottom clips.
- Then lift the frame slightly and pull the top clips away from the bead.
- The blind can be re-fitted by repeating the installation steps.
Important: Do not use excessive force when fitting or removing the frame. If the clips do not engage easily, double-check your measurements and ensure the bead depth is at least 18mm. Forcing the clips can damage the glazing bead or the frame.
Child Safety
Perfect Fit blinds are inherently child-safe because they have no external cords, chains, or loops. The operating mechanism is fully enclosed within the frame. This makes them an excellent choice for children’s bedrooms and nurseries.


Anonymous (verified owner) –
High quality Cool Sky! It blocks light well and feels sturdy. Installation guide was clear.
Upvote if this was helpful (0) Downvote if this was not helpful (0) Watch Unwatch Flag for removal
Anonymous (verified owner) –
High quality Cool Sky! It blocks light well and feels sturdy. Installation guide was clear.
Upvote if this was helpful (0) Downvote if this was not helpful (0) Watch Unwatch Flag for removal
Anonymous (verified owner) –
I recently installed the Cool Sky and it’s exactly as described. Great quality and easy to fit!
Upvote if this was helpful (0) Downvote if this was not helpful (0) Watch Unwatch Flag for removal
Anonymous (verified owner) –
Very happy with my Cool Sky. The finish and build quality are top-notch, would recommend!
Upvote if this was helpful (0) Downvote if this was not helpful (0) Watch Unwatch Flag for removal